
Introduction: Why Your Mulberry Pruning Might Be Sabotaging Your Harvest
You dream of buckets filled with sweet, juicy mulberries. You imagine pies, jams, and stained fingers. However, after taking your shears to the tree, you’re left with a disappointing harvest. What went wrong? The answer often lies in a few common pruning mistakes. Mulberry trees are vigorous and forgiving, but they have specific needs. Consequently, a well-intentioned trim can accidentally sabotage your fruit production for years.
What I Recommend
You can’t prune what you can’t see clearly, and you absolutely cannot prune well with dull or cheap shears—trust me, I’ve learned this the hard way. A good pair of anvil pruning shears will make clean cuts that heal faster and reduce disease entry, which is half the battle when you’re correcting pruning mistakes. After years of frustration with flimsy tools, investing in quality hand pruners was one of the best decisions I made for my orchard.
When you’re making bigger cuts to remove those poorly positioned branches or thick canes, a folding pruning saw becomes your best friend. I use mine constantly to cut back overgrown mulberries, and the folding design means I can actually keep it in my back pocket without stabbing myself—a small miracle.
After you’ve pruned and removed all that dead wood, your mulberry will appreciate some TLC to recover and produce a generous harvest. A balanced granular fertilizer formulated for acid-loving plants will give your tree the nutrients it needs to bounce back from the shock of heavy pruning and reward you with fruit production.
Keeping detailed notes about which branches you pruned, when you pruned them, and what the results were is invaluable for avoiding the same mistakes next season. I’ve been using a simple garden journal to track my plants, and it’s prevented me from repeating pruning disasters year after year—something I wish I’d started doing decades ago.
As an Amazon Associate, I earn from qualifying purchases.
This guide will expose the top five pruning blunders that lead to mulberry mayhem. In addition, we’ll provide clear, actionable fixes to get your tree back on track. By understanding these pitfalls, you can prune with confidence. Therefore, you can ensure a bountiful, delicious harvest season after season. Let’s turn your pruning problems into productivity.
Mistake #1: Pruning at the Wrong Time of Year
The Problem: Causing Sap Bleeding and Stressing the Tree
Have you ever pruned a branch in spring only to see it “weep” a watery sap for days? This is a classic sign of pruning at the wrong time. Mulberries, like maples and birches, have strong sap flow in the late winter and early spring. Pruning during this period creates open wounds that bleed profusely. This process, known as sap bleeding, isn’t usually fatal. However, it puts immense stress on the tree. The tree loses valuable sugars and water needed for new growth and fruit development. This stress can weaken it, making it more vulnerable to pests and diseases.
The Fix: Mastering the Dormant Season Pruning Window
The solution is simple: timing is everything. The absolute best time to prune your mulberry tree is during its dormant season. This is typically in late winter, after the harshest cold has passed but before the buds begin to swell. For most climates, this window falls between late January and early March.
Pruning during dormancy offers several key advantages. First, the tree’s sap flow is minimal, so bleeding is not an issue. Second, the tree is not actively growing, so the shock of pruning is greatly reduced. Finally, the bare branches make it much easier to see the tree’s structure. You can easily identify problem areas like crossing limbs or dead wood. Mark your calendar for late winter; your mulberry tree will thank you with a healthier life and a bigger harvest.
Mistake #2: Over-Pruning and Reducing Fruit Production
The Problem: Your Mulberry Tree Isn’t Fruiting After a Hard Prune
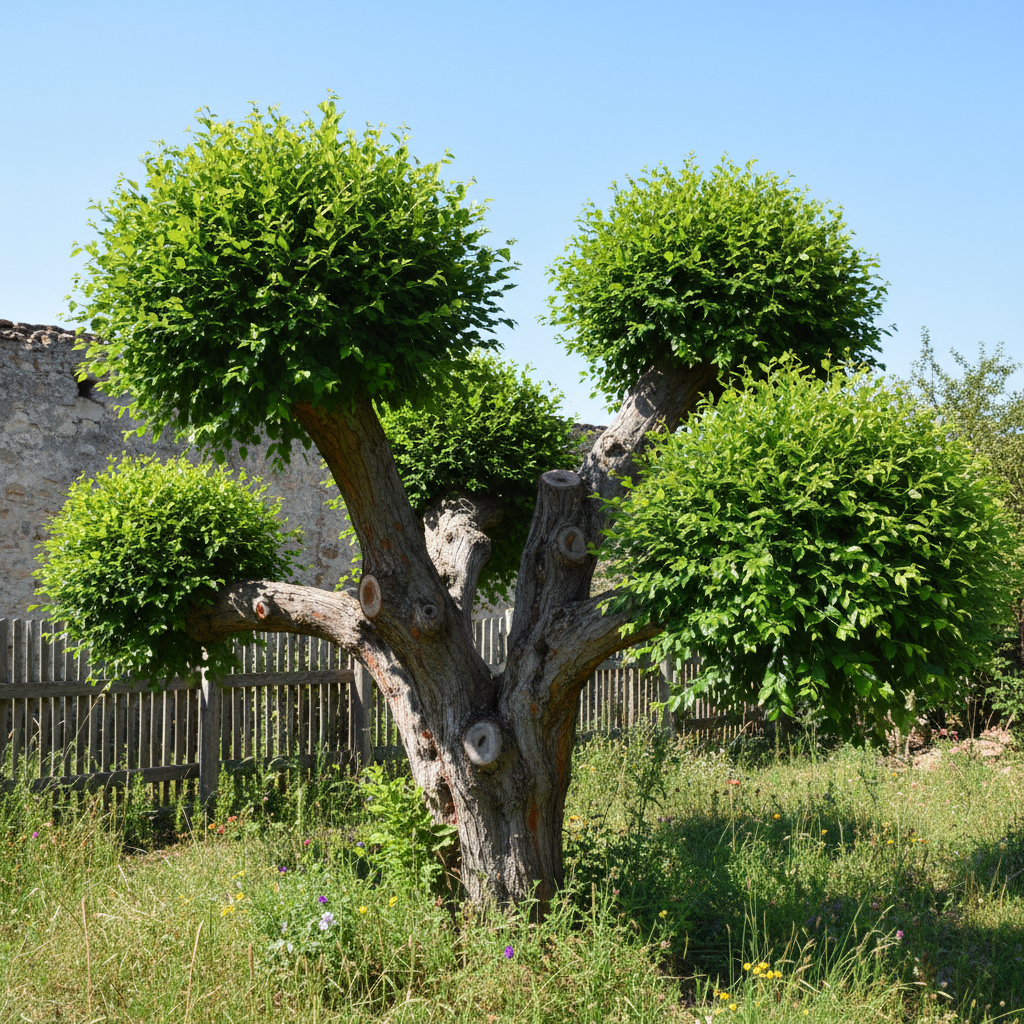
It’s a common and frustrating scenario. You give your overgrown mulberry a major haircut, expecting it to reward you with more fruit. Instead, you get a lush, leafy tree with almost no berries. What happened? You likely fell victim to over-pruning. Mulberries produce fruit on a mix of last year’s growth and older wood. When you perform a severe prune, you remove the majority of these fruit-producing buds.
In response to the heavy trim, the tree panics. It shifts all its energy into survival mode, which means producing vigorous, leafy vegetative growth (water sprouts) instead of fruit. Consequently, you get a beautiful green tree but a barren harvest.
The Fix: The ‘Less is More’ Approach for Abundant Fruit
When it comes to mulberries, restraint is key. Adopt a “less is more” philosophy. Never remove more than 25-30% of the tree’s canopy in a single year. Your primary goal should be maintenance, not a total makeover.
Follow these simple rules for a balanced prune:
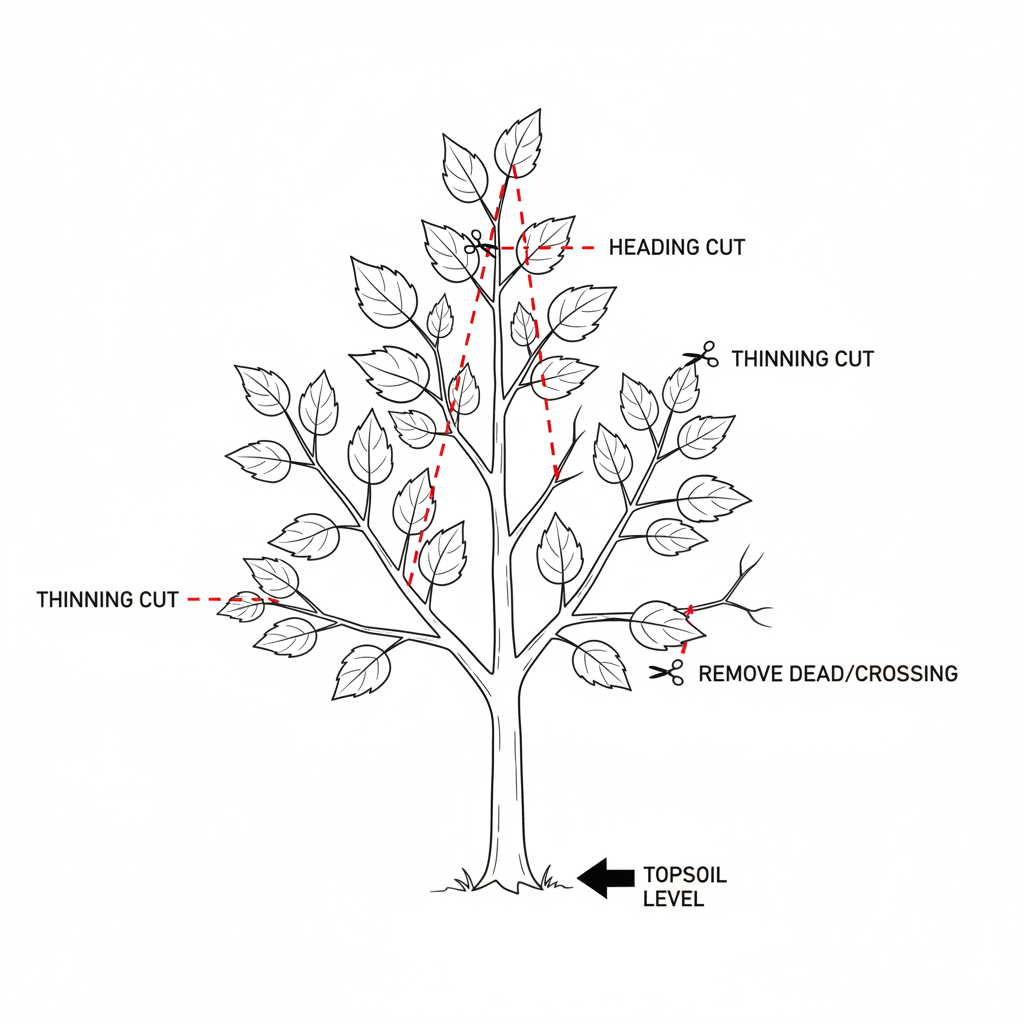
1. Start with the Three D’s: First, remove any wood that is Dead, Damaged, or Diseased. This is essential for tree health and doesn’t count against your main pruning budget.
2. Thin, Don’t Top: Instead of lopping off the top of the tree, selectively thin out branches. Focus on improving light and air circulation.
3. Prioritize Small Cuts: It’s always better to make several small cuts than one or two huge ones. This minimizes stress and promotes faster healing.
By taking a more measured approach, you preserve the essential fruiting wood while still shaping the tree for health and manageability.
Mistake #3: Making Large, Improper Cuts That Invite Disease
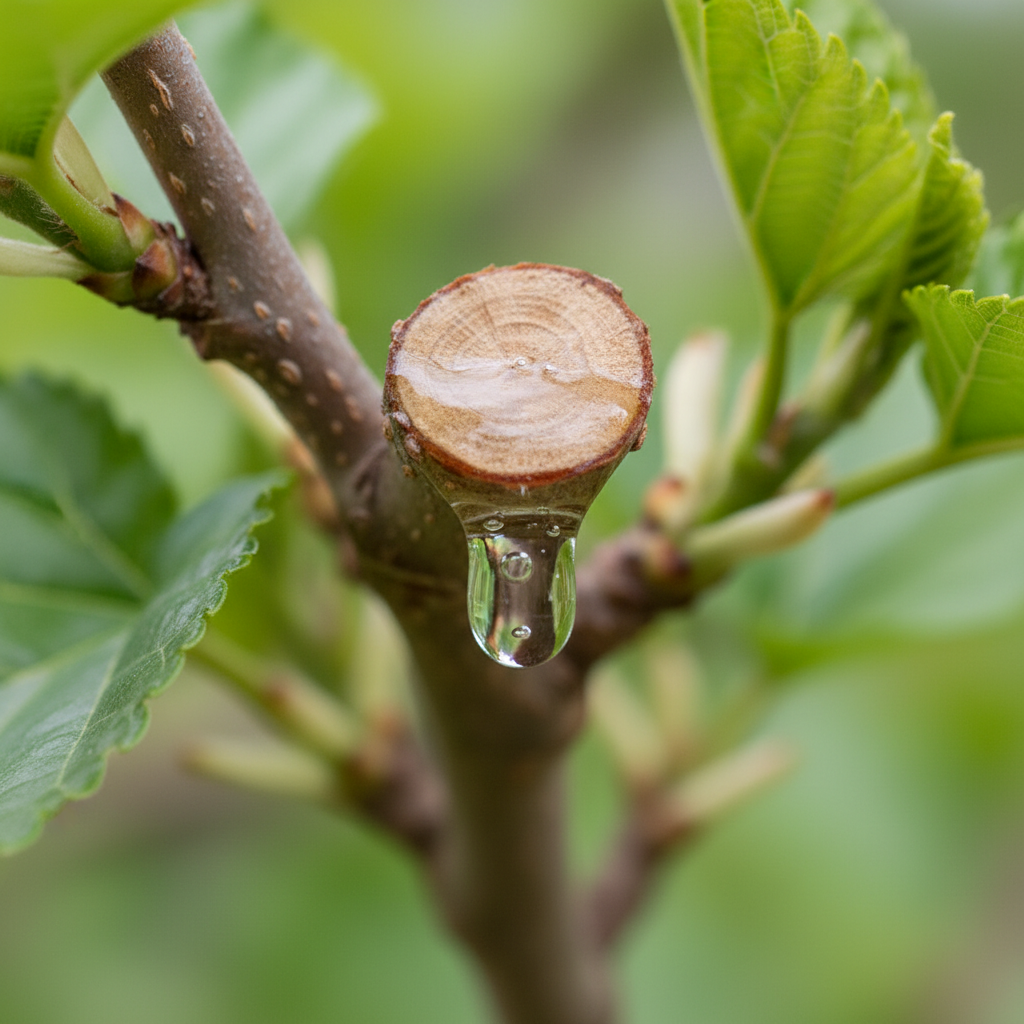
The Problem: Mulberry Tree Bleeding and Slow Healing Wounds
A pruning cut is a surgical wound. If done incorrectly, it becomes an open door for fungi, bacteria, and pests. Two common cutting errors cause major problems. The first is a flush cut, where you slice the branch off right against the trunk. This removes the branch collar, a raised area of tissue at the branch’s base that contains specialized cells for healing. Without it, the wound can’t seal properly. The second error is a stub cut, where you leave a long nub of the branch behind. This stub will die back and rot, creating a pathway for decay to enter the main trunk.
The Fix: Proper Cutting Techniques to Protect Your Tree’s Health
Protecting your tree’s long-term health depends on making the right cut every time. Always locate the branch collar first. It looks like a slightly swollen or wrinkled ring of bark where the branch meets the trunk. Your final cut should be made just outside this collar, at a slight downward angle away from the trunk.
For branches thicker than an inch in diameter, use the three-cut method to prevent the bark from tearing:
1. Undercut: About 6-12 inches from the trunk, make a cut from the bottom of the branch about one-third of the way through.
2. Relief Cut: An inch or two further out from the first cut, saw through the branch from the top. The branch will break away cleanly without tearing the bark down the trunk.
3. Final Cut: Now you are left with a manageable, lightweight stub. Make your final, careful cut just outside the branch collar.
This technique ensures a clean wound that the tree can seal quickly, effectively locking out disease.
Mistake #4: Ignoring Crossing Branches and Poor Airflow
The Problem: A Tangled Mess That Hinders Light and Fruit Growth
When left to its own devices, a mulberry can become a dense, tangled thicket of branches. This is more than just an aesthetic issue. When branches cross and rub against each other, the friction creates wounds in the bark. These wounds are perfect entry points for diseases. Furthermore, a dense canopy blocks sunlight from reaching the inner and lower parts of the tree. Fruit needs sunlight to ripen and develop sugars. Without it, you’ll get a poor, unevenly ripened crop. Poor airflow also traps moisture, creating the perfect humid environment for fungal diseases like powdery mildew.
The Fix: How to Prune for an Open, Healthy Canopy
Your goal is to create an open, vase-like or central-leader structure that allows light and air to penetrate every part of the tree.
Stand back and assess your tree before you begin cutting. Identify any branches that are:
Crossing over or touching other branches.
Growing back toward the center of the tree.
Growing straight up or straight down.
Forming crowded, parallel clusters.
Systematically remove the worst offenders. When you have two branches crossing, choose the one that is weaker, poorly placed, or less healthy and remove it. Each cut you make should have a purpose. For instance, ask yourself, “Will removing this branch give more light to the branches around it?” This targeted thinning will drastically improve your tree’s health and the quality of your fruit.

Mistake #5: Letting Suckers and Water Sprouts Steal Energy
The Problem: Unproductive Growth That Diverts Resources from Fruit
Have you noticed vigorous, whip-like shoots growing from the base of your tree or shooting straight up from its main branches? These are suckers and water sprouts, and they are energy thieves. Suckers emerge from the root system at the base of the tree. Water sprouts are fast-growing vertical shoots that erupt from latent buds on older branches, often after heavy pruning or stress.
Both types of growth are unproductive. They rarely, if ever, produce fruit. Instead, they divert a massive amount of water and nutrients away from the parts of the tree you care about—the branches that are developing your delicious mulberries. If left unchecked, they can quickly take over and reduce your overall yield.
The Fix: Identifying and Removing Suckers for Better Fruit Yield
Dealing with these energy drains is a simple but important task. The key is to remove them as soon as you spot them.
- For small, young suckers and sprouts: You can often just rip them off by hand. This removes the entire bud and makes it less likely to regrow.
- For thicker, woodier growth: Use a clean, sharp pair of hand pruners. Cut them as flush as possible to the trunk, branch, or ground from which they are growing. Do not leave a stub.
You can remove suckers and water sprouts at any time of year. In fact, making a habit of patrolling your tree once a month during the growing season is a great idea. It’s a quick job that pays huge dividends in fruit production.
Emergency Care: What to Do If You’ve Already Made These Mistakes
It happens. You’ve read this list and realized you’ve already committed one (or more) of these pruning sins. Don’t panic! Mulberry trees are incredibly resilient. Here’s how to perform some triage.
How to Help Your Over-Pruned Mulberry Tree Recover
If you went too far with the loppers, the best medicine is time and supportive care. Your tree will likely spend the next season or two focusing on regrowing leaves and branches. Resist the urge to prune it again. Instead, focus on providing an ideal growing environment.
- Water Consistently: Ensure the tree gets adequate water, especially during dry spells.
- Mulch: Apply a 2-3 inch layer of organic mulch around the base (but not touching the trunk) to conserve moisture and regulate soil temperature.
- Fertilize Lightly: In the spring, provide a light application of a balanced, slow-release fertilizer. Avoid high-nitrogen fertilizers, which will only encourage more leafy growth at the expense of future fruit.
- Be Patient: It may take a couple of years, but your tree will recover and begin fruiting again.
Treating Large Wounds and Sap Bleed
If you have a large, bleeding wound from a bad cut or poor timing, the best course of action is often inaction. Do not apply pruning paint or wound sealant. Research has shown that these products can trap moisture and pathogens, hindering the tree’s natural healing process.
Instead, let the wound air dry. The sap bleeding will eventually stop on its own as the tree begins to compartmentalize the injury. Keep the area clean and monitor it for signs of rot or disease, but otherwise, let nature take its course.
Conclusion: Prune with Confidence for a Bountiful Mulberry Harvest
Pruning a mulberry tree doesn’t have to be a source of mayhem and anxiety. By avoiding these five common mistakes, you can transform your pruning efforts from destructive to productive. Remember the core principles: prune in the dormant season, be conservative with your cuts, use proper techniques, create an open canopy, and remove energy-sucking growth.
With a little knowledge and a confident hand, you can work with your tree, not against it. Your reward will be a healthier, more beautiful tree and, most importantly, the sweet, abundant harvest you’ve been dreaming of. Now, go sharpen your tools and get ready for next winter.
This post contains affiliate links. If you make a purchase through these links, I may earn a small commission at no additional cost to you.