When you’re running a homestead with the goal of zero wasted harvest, a mulberry tree stops being ornamental and becomes one of your most productive assets — but only if you understand exactly how to time it, process it, and preserve it before the window closes. The problem most growers run into is that mulberries don’t wait for you: they ripen fast, drop faster, and if you’re not already set up with a preservation plan before peak season hits, you’re scrambling to save fruit that’s already halfway to compost. Lacto-fermentation changed how I think about that pressure entirely — instead of racing to can everything or dehydrate flat-out for a week straight, I now channel the surplus into fermented mulberry preserves that actually improve with time, require minimal equipment, and use nothing but the fruit, salt, and the wild microbes already living on the berry’s skin. This guide walks you through the full process from a homesteader’s perspective, meaning we’re talking about real batch sizes, real timing around a busy harvest schedule, and real troubleshooting for the weird purple-stained chaos that mulberry season actually looks like.
Those preserves turned out to be extraordinary — tangy, complex, alive with flavor in a way that regular jam simply is not. And as a bonus, they taught me more about lacto-fermentation in one batch than an entire season of reading had. If you have mulberries on your hands, a stalled wine project, or just a healthy curiosity about fermentation, this beginner guide to fermented mulberry preserves is exactly where you want to start.

What Are Fermented Mulberry Preserves, and Why Are They Different from Jam?
Let me clear something up right away, because I confused myself on this for longer than I care to admit. Fermented mulberry preserves are not jam. They are not jelly. They are not the shelf-stable, heat-processed, sugar-heavy spreads you grew up spreading on toast — though they are just as delicious on toast, for the record.
Lacto-fermentation is one of the oldest food preservation methods on earth. It relies on naturally occurring Lactobacillus bacteria, which are already present on the surface of fresh fruit, to convert sugars into lactic acid. That lactic acid acts as a natural preservative, giving fermented foods their characteristic tangy bite. No vinegar required. No canning equipment. No scary pressure cookers.
What you end up with in a batch of fermented mulberry preserves is something deeply flavorful — fruity and sweet on the front end, with a pleasantly sour finish and a subtle effervescence that makes your tongue pay attention. They also retain more of the mulberry’s natural nutrients than heat-processed preserves do, since you never cook them. The live cultures you introduce (or encourage) during fermentation add probiotic value as well. Honestly, once you taste the difference, it is hard to go back.
Mulberries are particularly well suited to lacto-fermentation because of their natural sugar content and their relatively thin skin, which breaks down quickly and releases juice. They ferment eagerly and reward patience generously.
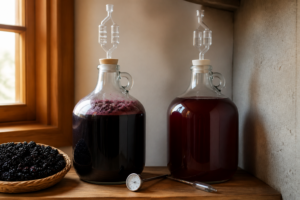
The One-Gallon Setup That Actually Fits a Real Harvest Window
Lacto-fermentation scales beautifully when you’re working with mulberries that ripen in compressed waves, but you need fermentation vessels sized for the actual pace of your harvest—not the fantasy of it. A one-gallon kit lets you process fruit in batches without committing to 5-gallon carboys that sit half-full or overflow when a second flush hits unexpectedly.
What works
- The airlock seal stays reliable through the full ferment cycle, even in the temperature swings between morning and afternoon in mid-summer when you’re pulling ripe fruit daily.
- One gallon is small enough to monitor flavor development without obsessing, and large enough that you’re not opening and tasting every three days and breaking the seal.
- When a batch is done (usually 2–3 weeks with mulberries), you can bottle it and move on to the next harvest surge without waiting for a massive carboy to age out.
What doesn’t
- The stopper and airlock assembly can feel flimsy the first time you’re force-fitting it into a carboy, and I’ve had to re-seat it mid-ferment after bumping the table.
- If you’re processing 20+ pounds of mulberries in a single week, one gallon feels cramped—you’ll need 3–4 running simultaneously, and storage space adds up fast.
I almost returned the kit after the first batch looked sluggish at day five, convinced the yeast had stalled, but it turned out I’d filled it too full and needed to pour some liquid into a secondary vessel. Home Brew Ohio Upgraded 1 Gallon Wine from Fruit Kit
Home Brew Ohio Upgraded 1 Gallon Wine from Fruit Kit
I bottle fermented mulberries every 2–3 weeks without waiting months between batches.
Check Price on Amazon →This post contains affiliate links. As an Amazon Associate, I earn from qualifying purchases at no extra cost to you.