The Manual Press That Finally Stopped Wasting Mulberry Juice All Over My Hands
Once your mulberry harvest climbs past 30 pounds in a season, hand-squeezing stops being feasible. Cheesecloth rips under pressure from all those seeds and pulp. A potato ricer leaves juice locked inside the pomace. A full wine press demands more space than most of us have and seems engineered for someone producing wine by the barrel, not someone trying to process a few dozen pounds of berries. The SQUEEZE Master manual press solved that problem entirely—no electrical cord, no complicated setup, nothing but downward pressure applied through a handle, and juice that actually ends up in a collection bowl instead of all over your hands and yard.
What works
- The screw-driven design hands you the control lever—you can work gently with mulberries, avoiding the crushing force of hydraulic systems that obliterate the fruit and trap juice inside the seed matrix.
- Stainless steel surfaces won’t hold that deep purple stain or absorb mulberry’s natural dye, which means cleanup takes minutes and your next batch won’t carry phantom flavors from the previous one.
- Since there’s no motor waiting for pressure to accumulate, you can load fruit, extract juice, empty the spent pulp, and reload in roughly three minutes flat per round.
What doesn’t
- Each run tops out somewhere between 2 and 2.5 gallons before the basket hits its limit, so processing 30 pounds of mulberries means devoting a full day or more to multiple separate batches.
- The manual screw mechanism demands genuine physical effort—your forearm and upper arm will feel the cumulative strain, and by the time you’ve finished four or five cycles, fatigue starts becoming noticeable.
How I actually use it
On a typical pressing day, I begin with mulberries that haven’t been sitting around or gotten bruised—they release their liquid far more readily that way. I load the stainless steel basket until it reaches roughly three-quarters capacity. Jam it fuller than that and juice shoots out around the sides instead of flowing down the channel toward your collection pan, which ruins your yield and splashes everywhere. A large bowl or pitcher positioned beneath the spout matters more than you might assume—I discovered this through a disaster where juice ran straight across my counter instead of into my container. From there, I rotate the handle with steady, measured force rather than jerking or applying sudden bursts of pressure. The screw mechanism multiplies your effort so effectively that you don’t require enormous upper-body strength to generate the necessary compression.
The opening batch invariably produces the most abundant flow—I commonly extract around 3 gallons from one filled basket. Later batches fluctuate according to the fruit’s ripeness and moisture content. On days when my mulberries haven’t fully matured, I might pull closer to 2.5 gallons instead.
My initial response after the first batch left my arms thoroughly sore was near-regret, but then I understood something crucial: breaking the work into manageable segments—five minutes pressing, then a rest—meant I could finish an entire harvest in a single day. I usually do three rounds of pressing, pause for 10 minutes to drink water and eat something, then tackle two or three more batches. The hand-crank design works in your favor here: you set the tempo, you choose when to rest, and you can lighten your downward force if the fruit starts responding differently.
Cleanup
Mulberry juice clings like a dye—because it essentially functions as one—but since the basket and pressing surfaces don’t soak up that deep color, a straightforward water rinse takes care of visible discoloration. Run water over everything and dry it with a cloth right after finishing, and it’s ready to put away. Procrastinating on cleanup works against you: if juice dries on the metal, it can leave a permanent shadow. Getting water on those surfaces within minutes of finishing ensures no staining accumulates.
You can grab the SQUEEZE Master Cheese Tincture Herb Fruit Wine Manual Press on Amazon.
SQUEEZE Master Cheese Tincture Herb Fruit Wine Manual Press
I press three gallons per batch without hydraulic mess or cross-flavor contamination between runs.
Check Price on Amazon →The Canning Kit That Stopped Me From Ruining a Whole Batch
Timing matters more than most beginners appreciate. With three pounds of fruit at peak ripeness waiting on the counter, dashing out mid-session to hunt for missing equipment isn’t an option—the fruit isn’t going to wait for you to figure it out. Having everything assembled and within arm’s reach beforehand transformed my success rate from inconsistent to reliable. Running out of reasons to delay, I finally pulled the trigger on a kit designed for newcomers to canning after years of relying on a regular kitchen spoon, a hope that jars would somehow seal themselves, and fingers singed by steam rising off hot fruit.
What performs well
- The jar lifter grips without slipping—I ditched my old chopstick method immediately the moment I used this tool to safely extract hot jars from boiling water in a single confident motion.
- Using the funnel reduces splatter and keeps jam off the jar’s rim, which directly influences whether the seal actually forms and holds.
- The stainless steel components resist corrosion through many batches, and overnight soaking doesn’t cause rust or discoloration.
What falls short
- Measuring pectin with the included spoons takes concentration when you’re moving quickly—I abandoned them and grabbed my regular kitchen measuring set instead.
- New lids aren’t included in the kit, and you won’t discover this until you’re ready to start—the packaging doesn’t flag it clearly.
I almost returned this after my first use because I thought the jar lifter was too short, but then I realized I was just impatient and not letting the jars cool properly. Canning Kit, Canning Supplies Starter Kit, Food Grade Stainless Steel Canning Set for Beginner, Canning Essential Tools for Water Bath & Pressure Canner, Canning Accessories Equipment for Pot, Black
Canning Kit, Canning Supplies Starter Kit, Food Grade
I used chopsticks before this kit. The funnel and lifter alone made sealing jars actually work.
Check Price on Amazon →This post contains affiliate links. As an Amazon Associate, I earn from qualifying purchases at no extra cost to you.
The Pruning Shears That Actually Cut Through Thick Mulberry Canes Without Crushing the Fruit
Harvesting mulberries requires precision—dull shears bruise the delicate fruit before it even hits your collection bucket, and struggling with inadequate tools means you’re picking by hand and losing berries to the birds while you work. A sharp bypass pruner makes the difference between a clean harvest and a frustrating, fruit-wasting afternoon.
What works
- Clean cuts on mulberry stems mean fruit stays intact and doesn’t separate from the branch prematurely, so you actually get it into your jar instead of watching it drop and split on the ground.
- The sharp blade cuts through tougher, woody canes without the crushing action that bruises ripe berries you’re about to preserve.
- One-handed operation lets you hold your collection container steady with the other hand while harvesting, which matters when you’re racing the birds and the heat.
What doesn’t
- You still need to clean and sharpen them regularly during peak harvest season, or they’ll start crushing instead of cutting within a couple weeks of heavy use.
- Stainless steel handles get slippery when your hands are wet from dew or from washing the mulberries off your fingers mid-harvest.
I almost abandoned these shears after the first week of harvest when I didn’t maintain the blade, but a quick sharpen brought them back to life and I’ve relied on them for three seasons since. Grab your own Fiskars bypass pruning shears before your harvest window opens.
Fiskars bypass pruning shears
I use these to harvest without crushing ripe berries or losing fruit to premature drop.
Check Price on Amazon →The Manual Press That Finally Stopped Wasting Mulberry Juice All Over My Hands
Once your mulberry harvest climbs past 30 pounds in a season, hand-squeezing stops being feasible. Cheesecloth rips under pressure from all those seeds and pulp. A potato ricer leaves juice locked inside the pomace. A full wine press demands more space than most of us have and seems engineered for someone producing wine by the barrel, not someone trying to process a few dozen pounds of berries. The SQUEEZE Master manual press solved that problem entirely—no electrical cord, no complicated setup, nothing but downward pressure applied through a handle, and juice that actually ends up in a collection bowl instead of all over your hands and yard.
What works
- The screw-driven design hands you the control lever—you can work gently with mulberries, avoiding the crushing force of hydraulic systems that obliterate the fruit and trap juice inside the seed matrix.
- Stainless steel surfaces won’t hold that deep purple stain or absorb mulberry’s natural dye, which means cleanup takes minutes and your next batch won’t carry phantom flavors from the previous one.
- Since there’s no motor waiting for pressure to accumulate, you can load fruit, extract juice, empty the spent pulp, and reload in roughly three minutes flat per round.
What doesn’t
- Each run tops out somewhere between 2 and 2.5 gallons before the basket hits its limit, so processing 30 pounds of mulberries means devoting a full day or more to multiple separate batches.
- The manual screw mechanism demands genuine physical effort—your forearm and upper arm will feel the cumulative strain, and by the time you’ve finished four or five cycles, fatigue starts becoming noticeable.
How I actually use it
On a typical pressing day, I begin with mulberries that haven’t been sitting around or gotten bruised—they release their liquid far more readily that way. I load the stainless steel basket until it reaches roughly three-quarters capacity. Jam it fuller than that and juice shoots out around the sides instead of flowing down the channel toward your collection pan, which ruins your yield and splashes everywhere. A large bowl or pitcher positioned beneath the spout matters more than you might assume—I discovered this through a disaster where juice ran straight across my counter instead of into my container. From there, I rotate the handle with steady, measured force rather than jerking or applying sudden bursts of pressure. The screw mechanism multiplies your effort so effectively that you don’t require enormous upper-body strength to generate the necessary compression.
The opening batch invariably produces the most abundant flow—I commonly extract around 3 gallons from one filled basket. Later batches fluctuate according to the fruit’s ripeness and moisture content. On days when my mulberries haven’t fully matured, I might pull closer to 2.5 gallons instead.
My initial response after the first batch left my arms thoroughly sore was near-regret, but then I understood something crucial: breaking the work into manageable segments—five minutes pressing, then a rest—meant I could finish an entire harvest in a single day. I usually do three rounds of pressing, pause for 10 minutes to drink water and eat something, then tackle two or three more batches. The hand-crank design works in your favor here: you set the tempo, you choose when to rest, and you can lighten your downward force if the fruit starts responding differently.
Cleanup
Mulberry juice clings like a dye—because it essentially functions as one—but since the basket and pressing surfaces don’t soak up that deep color, a straightforward water rinse takes care of visible discoloration. Run water over everything and dry it with a cloth right after finishing, and it’s ready to put away. Procrastinating on cleanup works against you: if juice dries on the metal, it can leave a permanent shadow. Getting water on those surfaces within minutes of finishing ensures no staining accumulates.
You can grab the SQUEEZE Master Cheese Tincture Herb Fruit Wine Manual Press on Amazon.
SQUEEZE Master Cheese Tincture Herb Fruit Wine Manual Press
I press three gallons per batch without hydraulic mess or cross-flavor contamination between runs.
Check Price on Amazon →The Canning Kit That Stopped Me From Ruining a Whole Batch
Timing matters more than most beginners appreciate. With three pounds of fruit at peak ripeness waiting on the counter, dashing out mid-session to hunt for missing equipment isn’t an option—the fruit isn’t going to wait for you to figure it out. Having everything assembled and within arm’s reach beforehand transformed my success rate from inconsistent to reliable. Running out of reasons to delay, I finally pulled the trigger on a kit designed for newcomers to canning after years of relying on a regular kitchen spoon, a hope that jars would somehow seal themselves, and fingers singed by steam rising off hot fruit.
What performs well
- The jar lifter grips without slipping—I ditched my old chopstick method immediately the moment I used this tool to safely extract hot jars from boiling water in a single confident motion.
- Using the funnel reduces splatter and keeps jam off the jar’s rim, which directly influences whether the seal actually forms and holds.
- The stainless steel components resist corrosion through many batches, and overnight soaking doesn’t cause rust or discoloration.
What falls short
- Measuring pectin with the included spoons takes concentration when you’re moving quickly—I abandoned them and grabbed my regular kitchen measuring set instead.
- New lids aren’t included in the kit, and you won’t discover this until you’re ready to start—the packaging doesn’t flag it clearly.
I almost returned this after my first use because I thought the jar lifter was too short, but then I realized I was just impatient and not letting the jars cool properly. Canning Kit, Canning Supplies Starter Kit, Food Grade Stainless Steel Canning Set for Beginner, Canning Essential Tools for Water Bath & Pressure Canner, Canning Accessories Equipment for Pot, Black
Canning Kit, Canning Supplies Starter Kit, Food Grade
I used chopsticks before this kit. The funnel and lifter alone made sealing jars actually work.
Check Price on Amazon →This post contains affiliate links. As an Amazon Associate, I earn from qualifying purchases at no extra cost to you.
The Container That Finally Stopped My Mulberries From Turning to Mush in 24 Hours
The core problem with mulberries boils down to their extreme tenderness and moisture profile. Every berry is basically a tiny juice packet with skin so thin it tears if you breathe on it wrong. They weep liquid that either pools underneath and ferments them or evaporates and leaves shriveled husks. Sealed containers trap condensation and rot the fruit within hours—zip-seal bags create condensation so heavy the berries turn into purple sludge by morning, and even nice glass containers just look prettier while the fruit decomposes inside them. Completely exposed berries dry out and lose texture even faster. What mulberries actually need is something that separates them from pooling moisture while still maintaining a controlled humidity environment—a design that keeps the fruit elevated above any accumulated liquid while maintaining just enough air circulation to prevent mold without drying the flesh.
Where this approach excels
- That removable perforated tray creates a gap between berries and the container bottom, so condensation drips down and away instead of turning your fruit into a fermented layer—I’ve consistently kept harvests fresh and intact for five to six days this way, versus the typical two-day collapse.
- The closure seals just tightly enough to preserve internal humidity without creating the sealed-jar effect that generates moisture buildup; berries stay plump and don’t desiccate at the edges because the environment stays balanced.
- Buying four individual containers instead of one large one lets you separate berries by maturity stage and picking day—putting fully ripe fruit in one unit and nearly-there berries in another prevents the riper ones from accelerating spoilage in neighboring fruit.
Where it comes up short
- Despite the label saying “small,” each container only holds roughly 1.5 cups of berries—when you’ve harvested several pounds across a picking session, you burn through your container capacity quickly and end up stacking units haphazardly in the refrigerator.
- The seal advertises airtight performance from day one, but the removable insert doesn’t actually sit flush against the lid until you’ve run them through the dishwasher and let them air-dry completely—using them fresh out of the box means moisture can slip past and compromise the whole setup.
I honestly doubted this would be different from the ten other “fresh-keeping” containers I’d wasted money on, and the first batch still molded faster than expected—until I realized I wasn’t letting the lids dry completely before storing them. Freshmage Fruit Storage Containers for Fridge with Removable Colander, Airtight Food Storage Container, Dishwasher Safe Produce Saver for Refrigerator, Keep Berry Fruit Fresh Longer 4 pcs Small Clear
Freshmage Fruit Storage Containers for Fridge with
I sort my daily mulberry picks by ripeness and they stay fresh a week in these containers.
Check Price on Amazon →The Pruning Shears That Actually Cut Through Thick Mulberry Canes Without Crushing the Fruit
Harvesting mulberries requires precision—dull shears bruise the delicate fruit before it even hits your collection bucket, and struggling with inadequate tools means you’re picking by hand and losing berries to the birds while you work. A sharp bypass pruner makes the difference between a clean harvest and a frustrating, fruit-wasting afternoon.
What works
- Clean cuts on mulberry stems mean fruit stays intact and doesn’t separate from the branch prematurely, so you actually get it into your jar instead of watching it drop and split on the ground.
- The sharp blade cuts through tougher, woody canes without the crushing action that bruises ripe berries you’re about to preserve.
- One-handed operation lets you hold your collection container steady with the other hand while harvesting, which matters when you’re racing the birds and the heat.
What doesn’t
- You still need to clean and sharpen them regularly during peak harvest season, or they’ll start crushing instead of cutting within a couple weeks of heavy use.
- Stainless steel handles get slippery when your hands are wet from dew or from washing the mulberries off your fingers mid-harvest.
I almost abandoned these shears after the first week of harvest when I didn’t maintain the blade, but a quick sharpen brought them back to life and I’ve relied on them for three seasons since. Grab your own Fiskars bypass pruning shears before your harvest window opens.
Fiskars bypass pruning shears
I use these to harvest without crushing ripe berries or losing fruit to premature drop.
Check Price on Amazon →The Manual Press That Finally Stopped Wasting Mulberry Juice All Over My Hands
Once your mulberry harvest climbs past 30 pounds in a season, hand-squeezing stops being feasible. Cheesecloth rips under pressure from all those seeds and pulp. A potato ricer leaves juice locked inside the pomace. A full wine press demands more space than most of us have and seems engineered for someone producing wine by the barrel, not someone trying to process a few dozen pounds of berries. The SQUEEZE Master manual press solved that problem entirely—no electrical cord, no complicated setup, nothing but downward pressure applied through a handle, and juice that actually ends up in a collection bowl instead of all over your hands and yard.
What works
- The screw-driven design hands you the control lever—you can work gently with mulberries, avoiding the crushing force of hydraulic systems that obliterate the fruit and trap juice inside the seed matrix.
- Stainless steel surfaces won’t hold that deep purple stain or absorb mulberry’s natural dye, which means cleanup takes minutes and your next batch won’t carry phantom flavors from the previous one.
- Since there’s no motor waiting for pressure to accumulate, you can load fruit, extract juice, empty the spent pulp, and reload in roughly three minutes flat per round.
What doesn’t
- Each run tops out somewhere between 2 and 2.5 gallons before the basket hits its limit, so processing 30 pounds of mulberries means devoting a full day or more to multiple separate batches.
- The manual screw mechanism demands genuine physical effort—your forearm and upper arm will feel the cumulative strain, and by the time you’ve finished four or five cycles, fatigue starts becoming noticeable.
How I actually use it
On a typical pressing day, I begin with mulberries that haven’t been sitting around or gotten bruised—they release their liquid far more readily that way. I load the stainless steel basket until it reaches roughly three-quarters capacity. Jam it fuller than that and juice shoots out around the sides instead of flowing down the channel toward your collection pan, which ruins your yield and splashes everywhere. A large bowl or pitcher positioned beneath the spout matters more than you might assume—I discovered this through a disaster where juice ran straight across my counter instead of into my container. From there, I rotate the handle with steady, measured force rather than jerking or applying sudden bursts of pressure. The screw mechanism multiplies your effort so effectively that you don’t require enormous upper-body strength to generate the necessary compression.
The opening batch invariably produces the most abundant flow—I commonly extract around 3 gallons from one filled basket. Later batches fluctuate according to the fruit’s ripeness and moisture content. On days when my mulberries haven’t fully matured, I might pull closer to 2.5 gallons instead.
My initial response after the first batch left my arms thoroughly sore was near-regret, but then I understood something crucial: breaking the work into manageable segments—five minutes pressing, then a rest—meant I could finish an entire harvest in a single day. I usually do three rounds of pressing, pause for 10 minutes to drink water and eat something, then tackle two or three more batches. The hand-crank design works in your favor here: you set the tempo, you choose when to rest, and you can lighten your downward force if the fruit starts responding differently.
Cleanup
Mulberry juice clings like a dye—because it essentially functions as one—but since the basket and pressing surfaces don’t soak up that deep color, a straightforward water rinse takes care of visible discoloration. Run water over everything and dry it with a cloth right after finishing, and it’s ready to put away. Procrastinating on cleanup works against you: if juice dries on the metal, it can leave a permanent shadow. Getting water on those surfaces within minutes of finishing ensures no staining accumulates.
You can grab the SQUEEZE Master Cheese Tincture Herb Fruit Wine Manual Press on Amazon.
SQUEEZE Master Cheese Tincture Herb Fruit Wine Manual Press
I press three gallons per batch without hydraulic mess or cross-flavor contamination between runs.
Check Price on Amazon →The Canning Kit That Stopped Me From Ruining a Whole Batch
Timing matters more than most beginners appreciate. With three pounds of fruit at peak ripeness waiting on the counter, dashing out mid-session to hunt for missing equipment isn’t an option—the fruit isn’t going to wait for you to figure it out. Having everything assembled and within arm’s reach beforehand transformed my success rate from inconsistent to reliable. Running out of reasons to delay, I finally pulled the trigger on a kit designed for newcomers to canning after years of relying on a regular kitchen spoon, a hope that jars would somehow seal themselves, and fingers singed by steam rising off hot fruit.
What performs well
- The jar lifter grips without slipping—I ditched my old chopstick method immediately the moment I used this tool to safely extract hot jars from boiling water in a single confident motion.
- Using the funnel reduces splatter and keeps jam off the jar’s rim, which directly influences whether the seal actually forms and holds.
- The stainless steel components resist corrosion through many batches, and overnight soaking doesn’t cause rust or discoloration.
What falls short
- Measuring pectin with the included spoons takes concentration when you’re moving quickly—I abandoned them and grabbed my regular kitchen measuring set instead.
- New lids aren’t included in the kit, and you won’t discover this until you’re ready to start—the packaging doesn’t flag it clearly.
I almost returned this after my first use because I thought the jar lifter was too short, but then I realized I was just impatient and not letting the jars cool properly. Canning Kit, Canning Supplies Starter Kit, Food Grade Stainless Steel Canning Set for Beginner, Canning Essential Tools for Water Bath & Pressure Canner, Canning Accessories Equipment for Pot, Black
Canning Kit, Canning Supplies Starter Kit, Food Grade
I used chopsticks before this kit. The funnel and lifter alone made sealing jars actually work.
Check Price on Amazon →This post contains affiliate links. As an Amazon Associate, I earn from qualifying purchases at no extra cost to you.
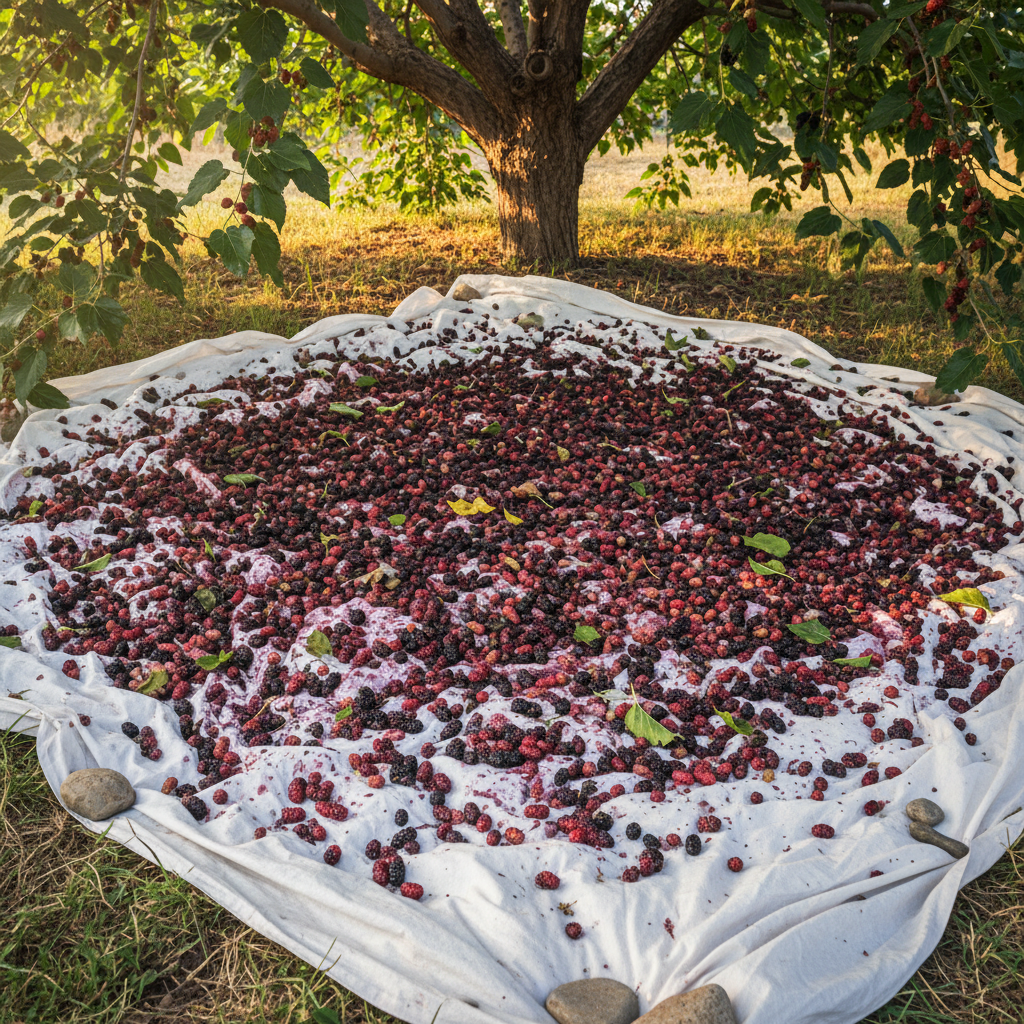
I have a photo on my phone from last August that tells the whole story: my back-patio concrete, blotted purple and almost black in places where the fruit had split open and run. Those weren’t wasted berries—they were evidence of how fragile mulberries truly are. Crack one open and leave it sitting for even a couple of hours in summer heat, and you’ve got staining liquid pooling beneath it. That photo proves exactly why I’ve spent fifteen years learning to move mulberries from branch to jar as fast as possible. The window is narrow. Their flavor is extraordinary. And if you don’t act, you lose them entirely to oxidation, fermentation, or the ground. This guide covers everything I’ve figured out—harvesting technique, storage windows, and how to turn that fleeting crop into jams, jellies, syrups, and cordials that’ll carry you through the entire year.

Why Preserve Mulberries? The Fleeting Joy of a Summer Delicacy
Mulberries won’t sit still in your refrigerator. Their thin skin tears if you so much as breathe on them wrong, and their high water content means they slide into fermentation or mold within forty-eight hours of picking. Grocery stores don’t bother stocking them for this reason—the fruit would arrive bruised and deteriorating. Yet when you preserve them, you’re locking in that impossible flavor: bright acidity threaded through with honey-like sweetness and a mineral undertone that only mulberries carry. What arrives on your toast in February tastes like June. What gets mixed into a winter cocktail carries the whole season in a single spoonful. Preservation stops time, essentially, transforming a fruit that’s genuinely here-and-gone into something your kitchen can hold onto for months.
The Container That Finally Stopped My Mulberries From Turning to Mush in 24 Hours
The core problem with mulberries boils down to their extreme tenderness and moisture profile. Every berry is basically a tiny juice packet with skin so thin it tears if you breathe on it wrong. They weep liquid that either pools underneath and ferments them or evaporates and leaves shriveled husks. Sealed containers trap condensation and rot the fruit within hours—zip-seal bags create condensation so heavy the berries turn into purple sludge by morning, and even nice glass containers just look prettier while the fruit decomposes inside them. Completely exposed berries dry out and lose texture even faster. What mulberries actually need is something that separates them from pooling moisture while still maintaining a controlled humidity environment—a design that keeps the fruit elevated above any accumulated liquid while maintaining just enough air circulation to prevent mold without drying the flesh.
Where this approach excels
- That removable perforated tray creates a gap between berries and the container bottom, so condensation drips down and away instead of turning your fruit into a fermented layer—I’ve consistently kept harvests fresh and intact for five to six days this way, versus the typical two-day collapse.
- The closure seals just tightly enough to preserve internal humidity without creating the sealed-jar effect that generates moisture buildup; berries stay plump and don’t desiccate at the edges because the environment stays balanced.
- Buying four individual containers instead of one large one lets you separate berries by maturity stage and picking day—putting fully ripe fruit in one unit and nearly-there berries in another prevents the riper ones from accelerating spoilage in neighboring fruit.
Where it comes up short
- Despite the label saying “small,” each container only holds roughly 1.5 cups of berries—when you’ve harvested several pounds across a picking session, you burn through your container capacity quickly and end up stacking units haphazardly in the refrigerator.
- The seal advertises airtight performance from day one, but the removable insert doesn’t actually sit flush against the lid until you’ve run them through the dishwasher and let them air-dry completely—using them fresh out of the box means moisture can slip past and compromise the whole setup.
I honestly doubted this would be different from the ten other “fresh-keeping” containers I’d wasted money on, and the first batch still molded faster than expected—until I realized I wasn’t letting the lids dry completely before storing them. Freshmage Fruit Storage Containers for Fridge with Removable Colander, Airtight Food Storage Container, Dishwasher Safe Produce Saver for Refrigerator, Keep Berry Fruit Fresh Longer 4 pcs Small Clear
Freshmage Fruit Storage Containers for Fridge with
I sort my daily mulberry picks by ripeness and they stay fresh a week in these containers.
Check Price on Amazon →The Pruning Shears That Actually Cut Through Thick Mulberry Canes Without Crushing the Fruit
Harvesting mulberries requires precision—dull shears bruise the delicate fruit before it even hits your collection bucket, and struggling with inadequate tools means you’re picking by hand and losing berries to the birds while you work. A sharp bypass pruner makes the difference between a clean harvest and a frustrating, fruit-wasting afternoon.
What works
- Clean cuts on mulberry stems mean fruit stays intact and doesn’t separate from the branch prematurely, so you actually get it into your jar instead of watching it drop and split on the ground.
- The sharp blade cuts through tougher, woody canes without the crushing action that bruises ripe berries you’re about to preserve.
- One-handed operation lets you hold your collection container steady with the other hand while harvesting, which matters when you’re racing the birds and the heat.
What doesn’t
- You still need to clean and sharpen them regularly during peak harvest season, or they’ll start crushing instead of cutting within a couple weeks of heavy use.
- Stainless steel handles get slippery when your hands are wet from dew or from washing the mulberries off your fingers mid-harvest.
I almost abandoned these shears after the first week of harvest when I didn’t maintain the blade, but a quick sharpen brought them back to life and I’ve relied on them for three seasons since. Grab your own Fiskars bypass pruning shears before your harvest window opens.
Fiskars bypass pruning shears
I use these to harvest without crushing ripe berries or losing fruit to premature drop.
Check Price on Amazon →The Manual Press That Finally Stopped Wasting Mulberry Juice All Over My Hands
Once your mulberry harvest climbs past 30 pounds in a season, hand-squeezing stops being feasible. Cheesecloth rips under pressure from all those seeds and pulp. A potato ricer leaves juice locked inside the pomace. A full wine press demands more space than most of us have and seems engineered for someone producing wine by the barrel, not someone trying to process a few dozen pounds of berries. The SQUEEZE Master manual press solved that problem entirely—no electrical cord, no complicated setup, nothing but downward pressure applied through a handle, and juice that actually ends up in a collection bowl instead of all over your hands and yard.
What works
- The screw-driven design hands you the control lever—you can work gently with mulberries, avoiding the crushing force of hydraulic systems that obliterate the fruit and trap juice inside the seed matrix.
- Stainless steel surfaces won’t hold that deep purple stain or absorb mulberry’s natural dye, which means cleanup takes minutes and your next batch won’t carry phantom flavors from the previous one.
- Since there’s no motor waiting for pressure to accumulate, you can load fruit, extract juice, empty the spent pulp, and reload in roughly three minutes flat per round.
What doesn’t
- Each run tops out somewhere between 2 and 2.5 gallons before the basket hits its limit, so processing 30 pounds of mulberries means devoting a full day or more to multiple separate batches.
- The manual screw mechanism demands genuine physical effort—your forearm and upper arm will feel the cumulative strain, and by the time you’ve finished four or five cycles, fatigue starts becoming noticeable.
How I actually use it
On a typical pressing day, I begin with mulberries that haven’t been sitting around or gotten bruised—they release their liquid far more readily that way. I load the stainless steel basket until it reaches roughly three-quarters capacity. Jam it fuller than that and juice shoots out around the sides instead of flowing down the channel toward your collection pan, which ruins your yield and splashes everywhere. A large bowl or pitcher positioned beneath the spout matters more than you might assume—I discovered this through a disaster where juice ran straight across my counter instead of into my container. From there, I rotate the handle with steady, measured force rather than jerking or applying sudden bursts of pressure. The screw mechanism multiplies your effort so effectively that you don’t require enormous upper-body strength to generate the necessary compression.
The opening batch invariably produces the most abundant flow—I commonly extract around 3 gallons from one filled basket. Later batches fluctuate according to the fruit’s ripeness and moisture content. On days when my mulberries haven’t fully matured, I might pull closer to 2.5 gallons instead.
My initial response after the first batch left my arms thoroughly sore was near-regret, but then I understood something crucial: breaking the work into manageable segments—five minutes pressing, then a rest—meant I could finish an entire harvest in a single day. I usually do three rounds of pressing, pause for 10 minutes to drink water and eat something, then tackle two or three more batches. The hand-crank design works in your favor here: you set the tempo, you choose when to rest, and you can lighten your downward force if the fruit starts responding differently.
Cleanup
Mulberry juice clings like a dye—because it essentially functions as one—but since the basket and pressing surfaces don’t soak up that deep color, a straightforward water rinse takes care of visible discoloration. Run water over everything and dry it with a cloth right after finishing, and it’s ready to put away. Procrastinating on cleanup works against you: if juice dries on the metal, it can leave a permanent shadow. Getting water on those surfaces within minutes of finishing ensures no staining accumulates.
You can grab the SQUEEZE Master Cheese Tincture Herb Fruit Wine Manual Press on Amazon.
SQUEEZE Master Cheese Tincture Herb Fruit Wine Manual Press
I press three gallons per batch without hydraulic mess or cross-flavor contamination between runs.
Check Price on Amazon →The Canning Kit That Stopped Me From Ruining a Whole Batch
Timing matters more than most beginners appreciate. With three pounds of fruit at peak ripeness waiting on the counter, dashing out mid-session to hunt for missing equipment isn’t an option—the fruit isn’t going to wait for you to figure it out. Having everything assembled and within arm’s reach beforehand transformed my success rate from inconsistent to reliable. Running out of reasons to delay, I finally pulled the trigger on a kit designed for newcomers to canning after years of relying on a regular kitchen spoon, a hope that jars would somehow seal themselves, and fingers singed by steam rising off hot fruit.
What performs well
- The jar lifter grips without slipping—I ditched my old chopstick method immediately the moment I used this tool to safely extract hot jars from boiling water in a single confident motion.
- Using the funnel reduces splatter and keeps jam off the jar’s rim, which directly influences whether the seal actually forms and holds.
- The stainless steel components resist corrosion through many batches, and overnight soaking doesn’t cause rust or discoloration.
What falls short
- Measuring pectin with the included spoons takes concentration when you’re moving quickly—I abandoned them and grabbed my regular kitchen measuring set instead.
- New lids aren’t included in the kit, and you won’t discover this until you’re ready to start—the packaging doesn’t flag it clearly.
I almost returned this after my first use because I thought the jar lifter was too short, but then I realized I was just impatient and not letting the jars cool properly. Canning Kit, Canning Supplies Starter Kit, Food Grade Stainless Steel Canning Set for Beginner, Canning Essential Tools for Water Bath & Pressure Canner, Canning Accessories Equipment for Pot, Black
Canning Kit, Canning Supplies Starter Kit, Food Grade
I used chopsticks before this kit. The funnel and lifter alone made sealing jars actually work.
Check Price on Amazon →This post contains affiliate links. As an Amazon Associate, I earn from qualifying purchases at no extra cost to you.