Standing in front of my Pakistan mulberry on a mid-June morning—the one planted near the back fence that consistently outproduces every other cultivar I’m growing—I found myself staring at nearly thirty pounds of ripe fruit hanging from the branches. The question wasn’t whether to preserve them; it was how to preserve them in a way that actually mattered come February. I’d spent years casually tossing mulberries into standard freezer bags, and I’d spent just as many January mornings disappointed by what I’d pulled out: shriveled, discolored fruit that tasted like a memory of mulberries rather than the real thing. That frustration pushed me to pay attention to the actual mechanics of storage—not just convenience, but what happens at the molecular level when you freeze delicate fruit and leave it sitting for months. The more I looked into it, the clearer it became that your choice between a vacuum sealer and a regular freezer bag shapes whether your mulberries taste like this year’s harvest or something closer to cardboard. If you’re investing your summer mornings into picking and processing, the preservation method deserves just as much thought as the picking itself.
| Method | Storage Duration | Quality Outcome | Cost |
|---|---|---|---|
| Freezer bags | 1 to 2 months | Acceptable | Minimal |
| Freezer bags | Past 2 months | Unreliable, quality loss | Minimal |
| Vacuum sealer | 12 to 24 months | Firm, deep color, bright-sharp sweetness | $80–100 |
| Vacuum sealer | 18 months or longer | Solid and pristine | $80–100 |
Why Freezer Bags Kept Failing Me (And Probably You Too)
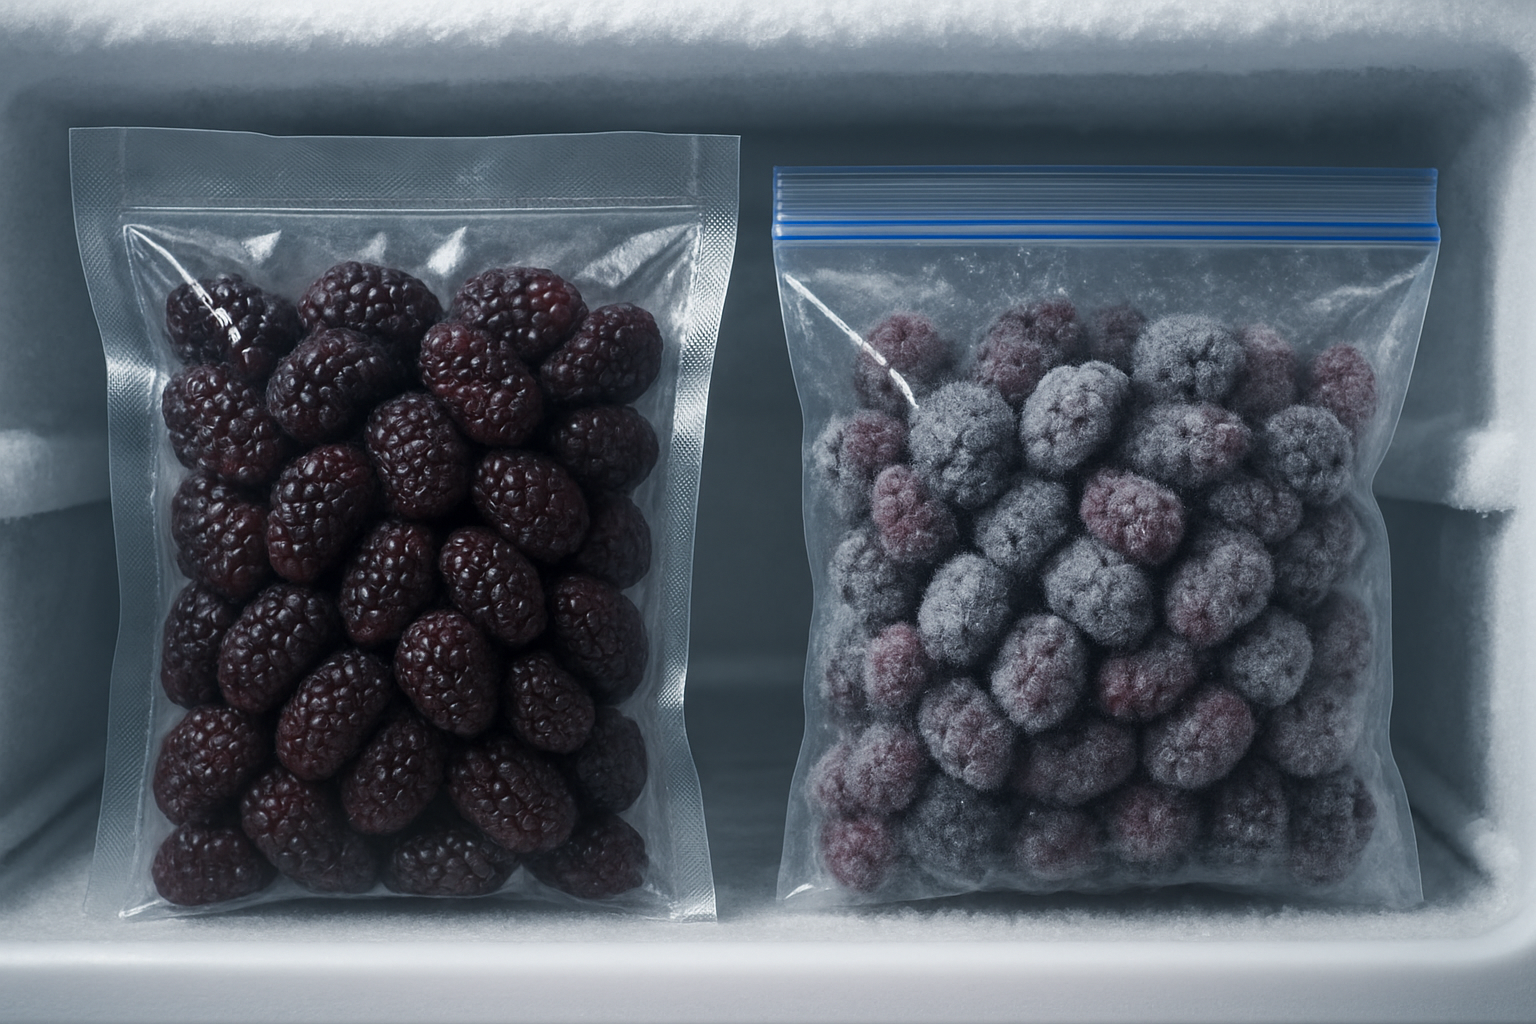
I discovered the problem last October when I opened a bag I’d sealed back in June. The answer wasn’t complicated, but it was instructive. My freezer temperature was fine. The bags themselves were middle-of-the-road quality, nothing fancy—just ordinary gallon-sized zip-lock seals from the grocery store. What I hadn’t reckoned with was the sneaky role of oxygen. Mulberries carry a lot of water weight and tissue softness that makes them uniquely vulnerable. Even the tiniest air bubble that lingered after I’d manually pressed the bag shut was working against me over time, triggering freezer burn and slowly stealing color and texture from every single berry in that container.
In practice, freezer bags work decently for shorter windows—roughly the first month or two after freezing. If your plan is to work through your mulberries by late summer or early fall in the same calendar year, you’ll probably walk away satisfied with what you pull out. Mulberry season yields generously but briefly, though, and I’ve made it part of my yearly rhythm to pull frozen mulberry dishes from my freezer well into the winter months. Once you push past that two-month mark, regular freezer bags stop being reliable. The risk becomes too high.
Reaching for a Vacuum Sealer: The Turning Point
Vacuum sealing removes nearly all air surrounding the fruit before sealing, which significantly slows both freezer burn and the breakdown of the fruit’s natural compounds. Vacuum-sealed mulberries kept frozen for 12 to 24 months retain their form and flavor substantially better than other freezing methods. Berries stored this way maintain firmness, color, and the signature bright-sharp sweetness of fresh mulberries throughout extended cold storage.
One technique matters enormously when you’re working with mulberries in particular, and skipping it ruins the whole project: you have to freeze them individually before you seal them. Mulberries contain so much liquid and have such soft flesh that running a vacuum sealer on unfrozen berries will compress them into a syrupy pulp. You need this intermediate step:
- After rinsing, dry each berry thoroughly—any surface water becomes your enemy in long-term storage
- Lay them out across a sheet lined with parchment, making sure they don’t touch
- Stick the whole sheet into your freezer for somewhere between two and four hours until each berry has frozen through
- Move the now-solid berries straight into vacuum bags and run the sealer right away
- Process smaller quantities at once rather than trying to seal everything—thawing starts the moment you pull berries from the freezer
This approach keeps the berries separate and firm, which means you can grab a handful without needing to defrost the entire bag every time. One small addition to your workflow, but it changes everything about how usable your preserved fruit becomes.
Which Vacuum Sealer and Bags Actually Work
The equipment side of this doesn’t require bankruptcy. I’ve found machines and supplies that deliver real results for home fruit preservation without costing you an arm:
The Sealer That Handles a Full Harvest and Keeps Fruit Frozen All Year
When your Pakistan or Pakistan Black hits its stride and you’re looking at 20+ pounds of fruit dropping in rapid succession, simple freezer bags turn into a losing game—I’ve watched quality tank and ice crystals proliferate by the spring thaw. A proper vacuum sealer flips that equation entirely, stretching your harvest into a year-round resource instead of watching months of growth end up wasted.
Where it shines
- Seals happen fast—about ten seconds per bag—so processing thirty portions in one session doesn’t wear you out or end in failed seals from rushing.
- Berries remain solid and pristine for eighteen months or longer—I’ve opened packages from the previous summer and found fruit clean enough for February smoothies with no off-tastes or degradation.
- Heat control sits at a sweet spot where tender berries don’t get squashed during the sealing process, and the unit cools back down rapidly enough to keep your workflow moving through bigger harvests.
The trade-offs
- Initial investment ($80–100 price range) stings a bit, and if you’re only freezing berries once or twice across several years, you might as well stick with standard bags and call it even financially.
- Packing berries too densely into bags or failing to remove surface moisture beforehand can trap dampness inside the seal, and then your vacuum seal won’t save you from some quality loss.
I nearly returned mine after the first use when I mistakenly filled a bag too full and the seal leaked—but once I switched to single-layer portions and patted berries dry, it became my most-used kitchen tool during harvest season. If you’re serious about preserving your mulberry gluts, Bonsenkitchen Vacuum Sealer Machine is worth the investment.
Frequently Asked Questions
How long can I keep mulberries in regular freezer bags?
In my experience, ordinary zip-lock freezer bags hold up decently for roughly the first month or two after freezing. If you plan to eat through your mulberries by late summer or early fall of the same year, you’ll likely be satisfied. Past that two-month mark, I found the bags stopped being reliable and quality loss became too likely.
Why do mulberries need to be frozen before vacuum sealing?
Mulberries hold so much liquid and have such soft flesh that running a vacuum sealer on unfrozen berries compresses them into a syrupy pulp. I rinse and dry each berry, spread them on a parchment-lined sheet without touching, and freeze them two to four hours until solid. Then they go straight into vacuum bags and get sealed immediately.
Why did my vacuum seal leak when bagging berries?
That happened to me on my very first use, and it came down to overfilling. Packing berries too densely, or failing to dry off surface moisture, traps dampness inside the seal and the vacuum won’t protect you from quality loss. Switching to single-layer portions and patting the berries dry fixed it completely for me.
Is a vacuum sealer worth the cost for a backyard mulberry harvest?
Vacuum sealing makes sense depending on volume. The initial investment sits in the $80–100 price range, and if you’re only freezing berries once or twice across several years, standard bags are financially comparable. When a mulberry tree produces 20+ pounds in quick succession, though, vacuum sealing becomes a practical kitchen tool during harvest.
Keep Reading
About This Article

Written by Ruth Nakamura. Ruth Nakamura is a backyard orchardist in the Pacific Northwest who has grown mulberries for fifteen years, cultivating twelve different varieties in her own backyard. Not a horticulturist by formal training - she shares what she has learned through hands-on growing, workshops, and connecting with nurseries and growers across the country. More about this site.
Scope and limits. Ruth is a backyard orchardist without formal horticultural training. Growing conditions vary enormously by region, so confirm variety, timing, and pest guidance with your local extension service.
Verify this against a primary source
Specifics change, and your situation may differ from the one described here. These are the authorities worth checking directly:
- USDA Plant Hardiness Zone Map — zone verification for your location
- Oregon State University Extension — fruit growing and pruning research
- USDA PLANTS Database — species range and identification