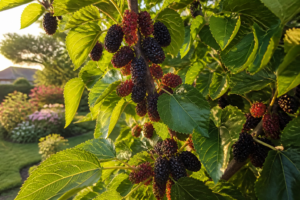
Two summers ago, my neighbor Ruth sold her house. The first thing the buyers mentioned at the fence was that the 40-year-old mulberry shading her back porch was “coming down for a patio.” That tree had fed my family jam for a decade — half its canopy hung over my side. I had exactly one weekend before the tree crew arrived, so I did the only thing a reasonable person would do: I took thirty cuttings, raided a low branch I should have air layered months earlier, and turned my potting bench into a triage ward. Three of those cuttings are now young trees in my back row, and last June one of them gave me a bowl of the exact berries I thought I had lost. That frantic weekend taught me more about how to propagate mulberry trees than the ten calm years before it — including which methods are worth your time and which mostly produce compost.
If you’ve ever stood in front of a mulberry tree you love and thought “I wish I could have more of this,” you’re in the right place. Propagating mulberries isn’t complicated, but it’s not one-size-fits-all either. Your success depends entirely on which method you choose and which mulberry variety you’re working with. Some methods are nearly foolproof; others will test your patience and your faith. After years of trial, failure, and the occasional small victory, I’ve learned what actually works — and what you should skip.
Why You Need to Know Your Mulberry Variety First
Before you cut a single branch, you need to know what you’re working with. This matters more than you’d think. White mulberries and hybrid varieties are cooperative; they root readily from cuttings and respond well to most propagation methods. Black mulberries are the stubborn relatives nobody mentions at family dinners. If you’re trying to propagate black mulberry, you’re working against biology — success rates from cuttings often drop below 20%, compared to 50–80% for white and hybrid mulberries. That difference isn’t trivial.
I learned this the hard way. My third attempt at black mulberry cuttings produced exactly one rooted plant from forty attempts. I blamed myself. I blamed the moon phase. I blamed the rooting powder. In the end, it was just black mulberry being black mulberry. If you have a black mulberry and you want to clone it, skip straight to air layering or grafting. You’ll thank me later.
Hardwood Cuttings: The Most Reliable Method for Most Mulberries
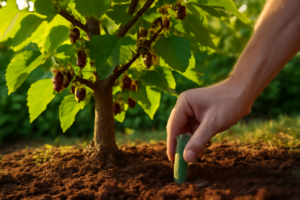
This is where most people should start when learning how to propagate mulberry trees. Hardwood cuttings from white or hybrid mulberries root better than anything else I’ve tried, and the timing is straightforward: late fall through early winter, when the tree is dormant and the wood has hardened off.
Here’s exactly what I do. I look for one-year-old wood — pencil-thick branches that are still flexible enough to bend slightly without snapping. I cut 8- to 12-inch sections, making the top cut at an angle (to remind myself which end is up) and the bottom cut straight across. Then I make a small wound on the bottom couple of inches by scraping away just a bit of bark with my fingernail or a knife. This wound helps rooting hormone make contact with the living tissue underneath.
Into the rooting hormone next. I’ve tested several brands over the years, and Hormex Rooting Hormone Powder #3 is honestly the one that made a visible difference in my strike rate. Dip the bottom two-thirds of your cutting into the powder, tap off the excess, and pot it up immediately in moist potting mix — not garden soil, which stays too wet and rots the cutting.
The potting mix should be about two-thirds below the soil line, one-third above. Pack it gently so there’s good contact between the cutting and the soil, but don’t compress it so hard you crush the tender cells that will become roots. Water thoroughly. Then — and this is important — put your pots somewhere cool and fairly humid, ideally a cold frame or unheated garage. You’re not trying to force growth. You’re trying to encourage root formation while the cutting is dormant.
If you want the full details on this process, I’ve written my full guide to growing mulberry from cuttings, where I walk through the whole progression from cutting to potted plant ready for spring planting.
Softwood Cuttings: Faster, But Riskier
If you’re impatient like I am, softwood cuttings offer an appealing shortcut. These are cuttings taken from tender, actively growing shoots in early summer — usually June or early July in most zones. They root faster than hardwood cuttings, sometimes in as little as three to four weeks instead of three to four months.
The catch: they need constant humidity and warmth, and they’re more prone to rot and disease. You’ll need a propagation setup with high humidity — I use a clear plastic dome over my pots, creating a little greenhouse effect. The soil should be kept consistently moist but not waterlogged. This is more hands-on than hardwood cuttings, but if you’re propagating in summer and you have the setup to maintain humidity, it works reasonably well for white and hybrid mulberries.
Air Layering: The Method for Black Mulberry and Problem Branches
Air layering is the method I should have used on that branch hanging over my fence. It’s slower than cuttings, but it’s far more reliable — especially for black mulberry — and it lets you propagate larger, more mature wood that has a better chance of growing into a substantial plant quickly.
The process starts in late spring, usually May or June. Pick a branch that’s pencil-to-finger thick and actively growing. Make a small wound by removing a ring of bark — about a half-inch wide �� or by scraping away the bark to expose the cambium layer underneath. This wound is what triggers the branch to form roots.
Wrap the wound in a ball of moist sphagnum moss — the kind you buy for orchids works perfectly. Then wrap the whole thing tightly in plastic wrap, creating an airtight seal. Tape it closed so the moss stays moist. Check it every couple of weeks. You’re looking for roots to push into the moss from the wound, which usually happens in 6–10 weeks during warm weather.
Once you see roots through the plastic, cut the branch just below the rooted section and pot it up into a small container with potting mix. Keep it moist and in bright, indirect light for the first few weeks while it adjusts to being independent. This method feels like magic the first time it works, and it’s honestly the most reliable way to clone a black mulberry.
Growing from Seed: Why It’s Usually Not Worth It
Seeds are tempting. They’re free, they’re tiny and easy to store, and there’s something romantic about growing something from the ground up. Don’t be seduced.
Mulberry seeds require cold stratification — roughly 30–90 days of cold, moist conditions — before they’ll germinate reliably. That’s manageable. The real problems start after germination. Seedlings don’t grow true to the parent variety. If you’re growing from seed, you’re essentially gambling. You might get a delicious fruit tree, or you might spend five to ten years growing a tree that turns out to be male and produces no fruit at all. This happens because mulberries are often dioecious — separate male and female trees. A seedling is a coin flip.
I grow mulberry seedlings occasionally, mostly for rootstock to graft onto. If you’re simply trying to replicate a specific tree you love, seed is the wrong tool. You need one of the methods above.
Grafting: The Professional Method for Exact Reproduction
Grafting is how nurseries guarantee they’re selling you exactly what they promised. It’s also the most reliable way to get a known variety onto established rootstock, which is useful if you’re trying to change what an older tree produces.
The standard technique is whip-and-tongue grafting or cleft grafting, done in late winter just before bud break — February or March, depending on your zone. You take a scion (a small branch with buds from your desired variety) and join it to rootstock (a young mulberry seedling). If the cambium layers line up and the graft is wrapped tightly and sealed, they’ll fuse together, and you’ll have a tree that’s genetically identical to the parent variety, growing on fresh roots.
Grafting has a learning curve, and I won’t pretend it’s quick. But if you want to know whether grafting mulberry trees is worth the effort for home gardeners, I’ve written an entire post exploring the real pros and cons. The short version: it’s worth learning if you’re serious about having multiple varieties or if you’re trying to change an established tree.
Products I Use and Recommend
Over the years, I’ve collected a few tools and products that genuinely make propagation easier. If you’re serious about trying any of these methods, these will help.
- Hormex Rooting Hormone Powder #3 — This is the rooting powder that made my cuttings actually root. I’ve tested others, and the difference in strike rate is noticeable. It’s worth having on hand.
- Zenport Grafting Tape — If you try grafting, good tape makes all the difference. This tape stretches as the graft heals and doesn’t girdle the delicate union.
- Seed Starter Trays with Humidity Domes — For softwood cuttings or seed stratification, a good humidity dome keeps things humid without constant misting. This set is durable and fits on a windowsill.
Which Method Should You Actually Use?
Let me cut through the options with a simple framework. If you have a white or hybrid mulberry and you want the easiest path: hardwood cuttings, no question. They root reliably, they don’t require special equipment, and success rates are high enough that taking ten cuttings means five or six will probably live. If you have black mulberry or a branch you want to clone quickly: air layering. It’s slower, but it works when cutting fails, and you end up with a larger plant faster. If you’re trying to exactly replicate a specific cultivar or change an old tree: grafting. It’s more technical, but it’s the only way to guarantee genetic identity on mature rootstock. And seeds? Skip them unless you’re okay with surprises and have time to waste.
What I’ve learned over the years is that knowing how to propagate mulberry trees isn’t really about having one magic method. It’s about having options and understanding which tool fits which problem. That weekend when Ruth’s mulberry was coming down, I threw everything at it because I was desperate — hardwood cuttings, air layering, even a couple of softwood attempts. Three rooted plants came out of that chaos, and one of them is bearing now. I didn’t know what would work, so I tried everything. You don’t have to be that frantic. Start with what makes sense for your variety and your timeline, and don’t overthink it. Most mulberries want to propagate. You just have to give them the right conditions and a little patience.
Take a branch this season. Dust it with rooting hormone. Pot it up. In six months or a year, you might be looking at a small tree that’s a genetic copy of the original — tall enough to plant in the ground, ready to feed you the same berries you’ve loved. That’s worth a little effort.
This post contains affiliate links. As an Amazon Associate I earn from qualifying purchases at no extra cost to you.